How to use Products' Metafields as Data Parameters
A short guide on how to activate and use Metafields in the app.
Miriam from Kimonix
Last Update 2 months ago
Metafields help you to customize the functionality and appearance of your Shopify store by letting you save specialized information. You can use metafields for internal tracking, or to display specialized information on your online store in a variety of ways. Read Shopify's guide here.
In the app, you can use your metafields as data parameters, to sort and filter your collections.
Here's how:
Step 1: Activate the Products' Metafields sync.
- On the Settings page -> Scroll down to the Products' Metafields section.


Step 2: Add the relevant namespaces.
Namespace = A grouping of metafields. One namespace can be used for several metafields.
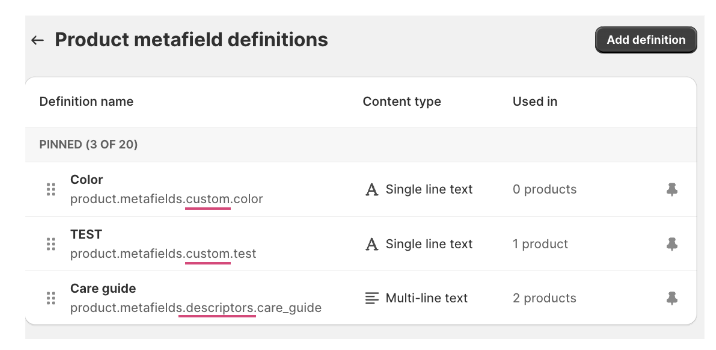
- To find the namespaces, go to your Shopify admin -> Settings -> Custom data -> Products.
- The namespace is shown before the last dot. This is the name of the metafield group.

- In our example, we have 2 namespaces to add: custom and descriptors.

Good to know: To add several namespaces, use a comma between each.
Step 3: Save & Sync.
- Click the "Save & Sync Metafields" button.
- Refresh the page after a few minutes (the sync can take up to 20 minutes).
Step 4: Start using the Metafields as Filters and Sorters for collections.
- Your Metafields will show at the bottom of the sorters and filters parameters list.


